Content helps your community and your audience relate to you - the
more helpful and relatable you are, the more people want to begin a
relationship with you. Isn’t that how you began most of your friendships, whether they be
online or off, by relating and finding things in common with people?
Relationships deepen, you're there when friends need you, and
they're there when you need them. The more you consistently put out
great, helpful content, the more people learn that you're someone they
can look to when they have questions, that your brand is a
presence they can rely on. And that leads to trust - and for a brand,
trust is the most important goal, in a marketing sense.
People buy from people they trust. When I set out to create content - either for my own blog or on
behalf of one of my clients - I always start out with three very
specific questions to guide my words:
Is this necessary?
Is this needed?
Is this helpful?
While it might appear that Questions 1 and 2 are the same,
they’re actually quite different - I look at Question 1 from a utility
perspective: "do I have the opportunity to help people find information
on something I haven’t myself, been able to find information on?" While I
look at Question 2 more from a community standpoint: "have I been
listening and talking with my communities and have I found that they're
asking for this type of information?"
If I can answer 'yes' to each of those three questions, I'm more
confident in sitting down to write. If I can't answer 'yes' to each of
them, I remind myself that I’m not writing just for my own enjoyment,
I’m writing for the people in the communities I keep myself in and
serve. When I'm writing for a brand, I always try to keep on top of my
mind – '"this isn’t about me. This is about my customers".
If I'm aiming to create more of a content marketing “strategy”, there
are more things to consider, and it’s necessary to delve a bit deeper.
Before beginning any sort of plan, you need to ensure that you know your
goals and who you're creating content for.
You can break down the plan to create your social media and content marketing strategy into nine key steps.
1. Define goals/marketing objectives
Are your key goals in line with our overall company objectives? How
will social media and your content marketing program help you get closer
to achieving those goals?
These are key questions you need to ask in defining an effective strategy, as opposed to simply 'doing' social and content.
2. Establish current situation
Once you've chosen your goals, you need to create or align your various social media accounts.
If there are accounts already in place, conduct a social media audit
to see where your business currently stands - this will help create a
baseline that you can look at later to see if there's been improvement.
3. Define audience
Have you defined your audience? Do you know who'll be receiving the content you'll be providing (and how)?
Creating buyer personas and identifying the key traits of your
audience is an essential element in effective planning, and cannot be
overlooked.
4. Measure Demand
Have you taken the time to understand what content your audience is
looking for, what questions they're asking that haven't been answered?
While you can never stop listening and talking with your community
and audience, you have to start somewhere in order to guide your
process.
5. Understand consumption behaviors
What format does your audience and community like to receive content
marketing in? Is it infographics? Videos? Text? Blogs? Live Streams?
Webinars?
What types of content are generating the most response within your niche?
6. Identify Key Platforms
Where will you distribute your content – where is your community most active right now? Where is your audience?
Where are the people you're not yet reaching but aim to?
There's no point focusing on Twitter if your audience is all on
Facebook - knowing where to share is as important as what you're
sharing.
7. Allocate Resources
Do you currently have the staff, resources and budget for your content marketing plan to be effective?
Once you know the answers to the previous questions, you'll have a
better idea of projected scope - is this something you can feasibly
maintain?
If not, where we will get more resources?
8. Establish Tracking Criteria
How will you identify, track and analyze the key metrics for your
campaign? Each element has it's own measurements - sales would be click
rates and conversions, awareness might be audience growth and
engagement.
The only way to know if you're getting closer to realizing your
strategic goals is by putting trackable, traceable data criteria in
place.
9. Create with Focus
Once you've established what content your audience is seeking and
where to distribute it, you're ready to create a content plan and
editorial calendar. And then, begin writing.
The most important thing to remember is that although you've laid out
a roadmap with your strategic plan, you always have to plan for 'the
unplannable'. You'll need to be ok with the idea that your entire plan
might need to be scrapped and rewritten at any time.
As a social media manager, understanding how to leverage Facebook Ads for your marketing strategy is essential. Facebook Ads can transform your business’s social reach without hurting your budget.
In this guide we’ll share with you everything you need to know about
advertising on Facebook—from setting up a campaign to tracking results.
What is Facebook advertising?
Facebook advertising allows businesses to promote custom ads or
content targeting a specific audience, with costs varying based on the
reach and engagement the ad receives. Facebook ads can appear in your
target audience’s News Feed or right column of Facebook. Image via Facebook.When you advertise on Facebook, you’ll gain insight about your
current and potential customers. The data you collect through Facebook
ads allows you to improve your ad targeting for a more efficient and
effective advertising experience.
3 Facebook advertising best practices
Before you begin, remember these three Facebook advertising best practices:
Always determine your objectives before you start. It’s
important to know the purpose of your Facebook Ad before you decide on a
budget for advertisements. Understand whether the aim is to increase
for brand awareness, conversions, video views, etc. Each action made by
your audience on your Facebook ad costs money, so make sure you solidify
your objectives before making those investments.
Be specific on your audience targeting.
Facebook houses millions, if not billions, of data points. Take the
time to narrow your audience targeting to ensure your ad will appear
where the people you want to see it will be.
Rotate your ads regularly. To avoid
ad fatigue, rotate your Facebook ads regularly. ‘Ad fatigue’ is when
people see your ad too many times, so they get bored and stop clicking.
Unfortunately, when your clickthrough rate starts to drop, Facebook
penalizes you, driving up your cost per click (CPC)—which makes likes,
comments, and clickthroughs more expensive. This affects both
acquisition and engagement campaigns.
How to advertise on Facebook in 7 simple steps
With these seven steps, you’ll be able to define your objective, target an audience, set a budget, and place your ad.
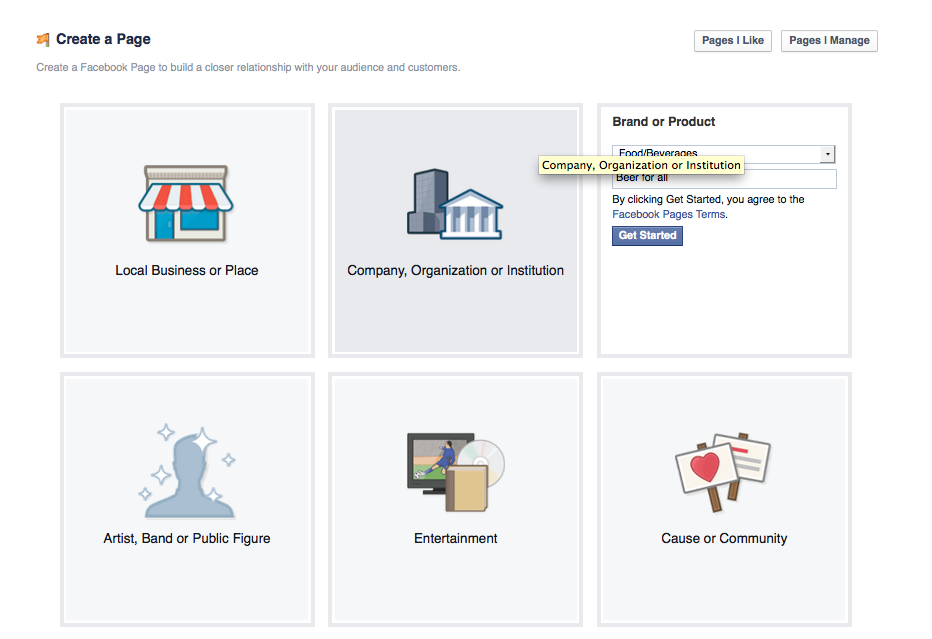
Step 1: Create a Facebook business page
When creating a Facebook Page,
an important step is determining the category of the Page. Choose an
appropriate category that best describes the nature of your business and
will help people find your Page. The category name is displayed on your
Page, so it’s one of the first things a user sees when they visit your
brand on Facebook.
Click Get Started and follow the on-screen instructions
Keep these best practices in mind when creating a Facebook Page:
Fill out your page info in full detail
Include a relevant Facebook profile and cover photo
Have a Facebook Page strategy
Step 2: Create goals for your Facebook ads
When creating a strategy for your Facebook Ads, make sure your goals are S.M.A.R.T. goals—specific,
measurable, attainable, relevant, and time-bound. Creating S.M.A.R.T.
goals for your Facebook Ads will help you achieve a better return on
investment.
For example, if you’re running a conference, your goal can be:
acquire 100 registrants in two months. This goal will now guide your
Facebook Ad strategy and help you choose the right type of ad.
Step 3: Choose an objective for your campaign
Now that you have created your Facebook Page and have goals for your
ads, you can now go into the Facebook Ads manager and choose an
objective for your ad.
If your goal is to acquire registrants for an upcoming event, the
Facebook Ad objective you would choose is to “Raise attendance at your
event.” Or if you want to drive people to your blog, then you would
choose the objective, “Send people to your website.”
Learn more about specific campaign options and how they can help you meet your objectives in this video.
Step 4: Choose your target audience and ad spend
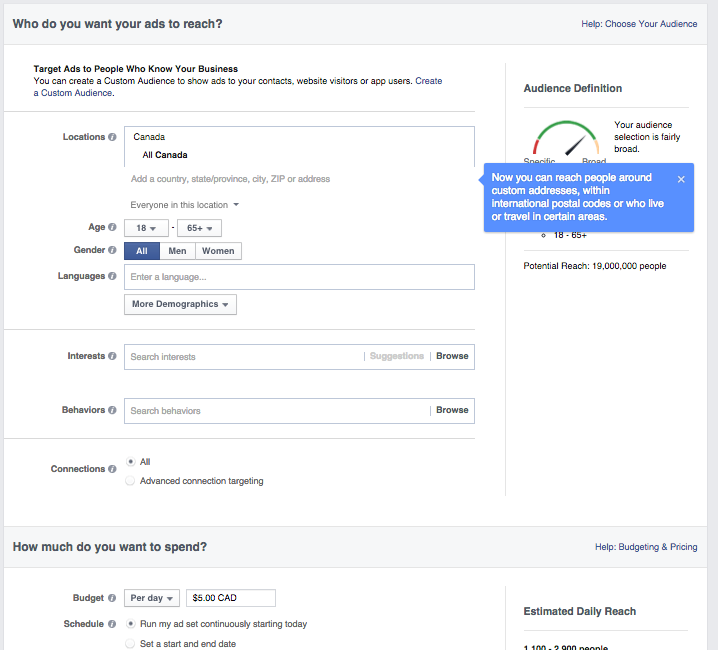
Customize your target audience
This step is crucial in setting your Facebook ad up for success. You
can target ads based on location, age, gender, language, interests, and
behavior.
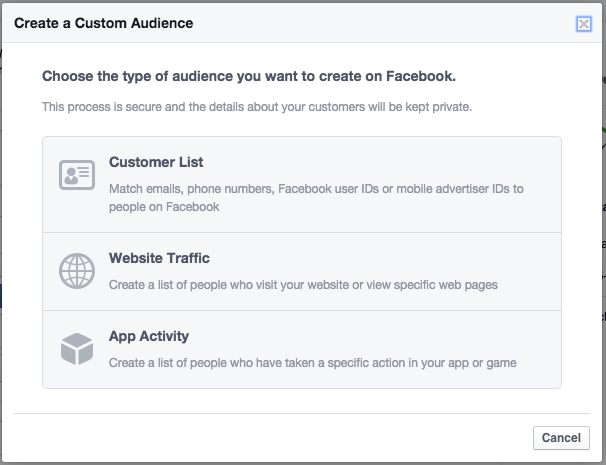
You can further customize by creating custom audiences
to reach people who already know your business, or to remove them from
your ad’s target audience so you can reach new people on Facebook. These
custom audiences can be created through a customer list, website
traffic, or app activity. Targeting the right audience will ensure you get the most out of your
Facebook advertising dollars. For advanced audience research and
targeting tactics, watch the video below.
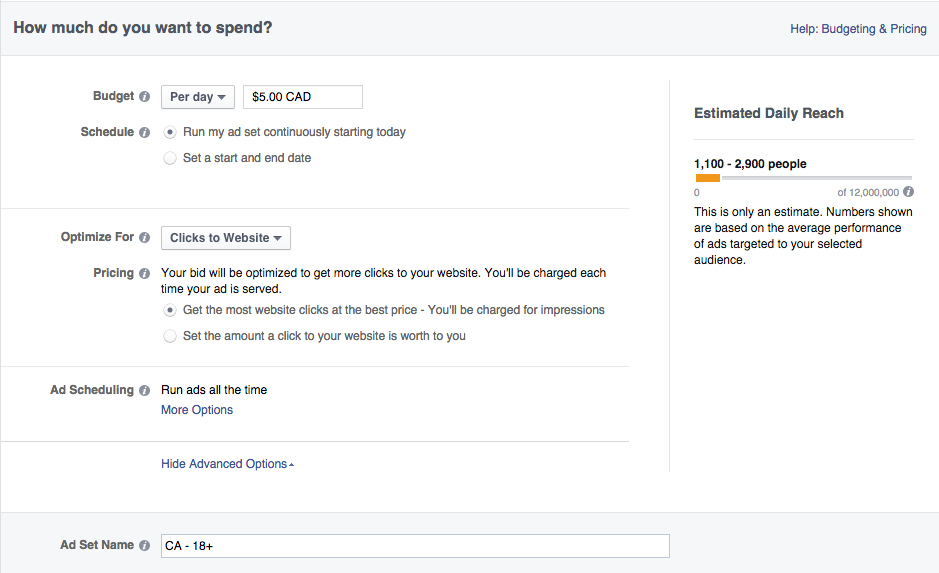
Choose your budget
After you’re done choosing your target audience, you can then choose
how much you want to spend on your ad. The ad budget you set is the
maximum amount you want to spend. If you choose to have a daily budget,
the amount you enter will be the maximum amount you’ll spend each day.
If you do a lifetime budget, the amount you enter is the maximum you’ll
spend during the lifetime of your ad.
Choose your objective
First, choose to bid for an objective: clicks or impressions. This
will determine how you will pay and who your ad will be served to. For
example: if you optimize for the Page like objective, you’ll be charged
when your ad is shown to people who might be more inclined to like your
Page.
Once you’ve placed a bid for your objective, choose when you want
your ad to run under ad scheduling. If you choose the lifetime budget
route, you choose specific hours and days of the week when you want your
ad to run.
Choosing to run your ad on a schedule is the most efficient way to
spend your ad budget wisely; this means that you are only serving your
ad when your target audience is most likely on Facebook. For example, if
you chose to target a specific region, you want to make sure you’re
scheduling your ad when they are awake, this will allow you to make sure
your ad will be seen by the people you want to target.
Step 5: Choose how you want your ad to look
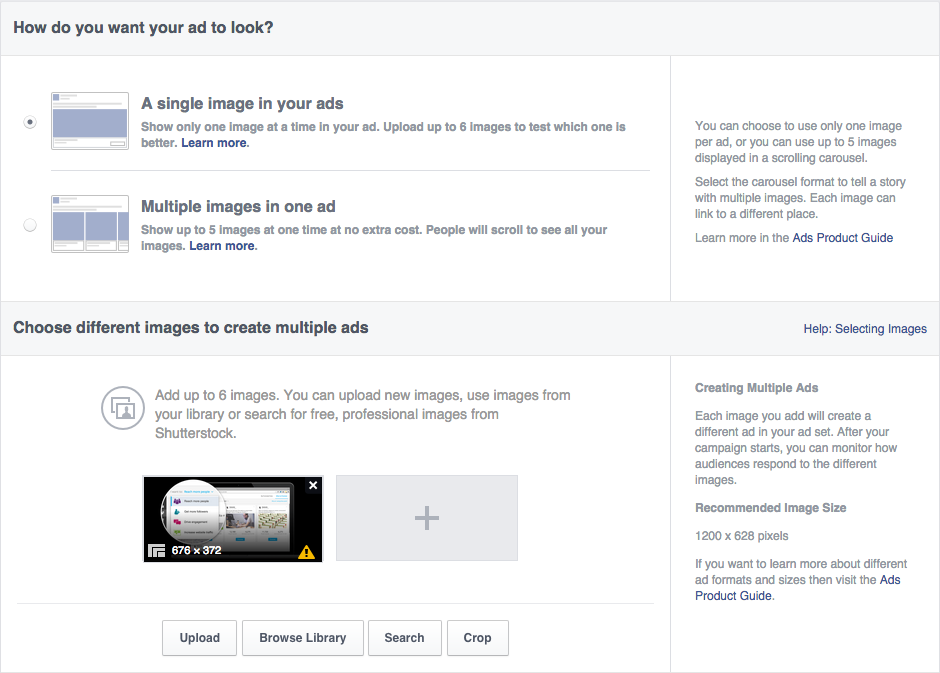
The actual creation of the ad is the fun part of advertising on
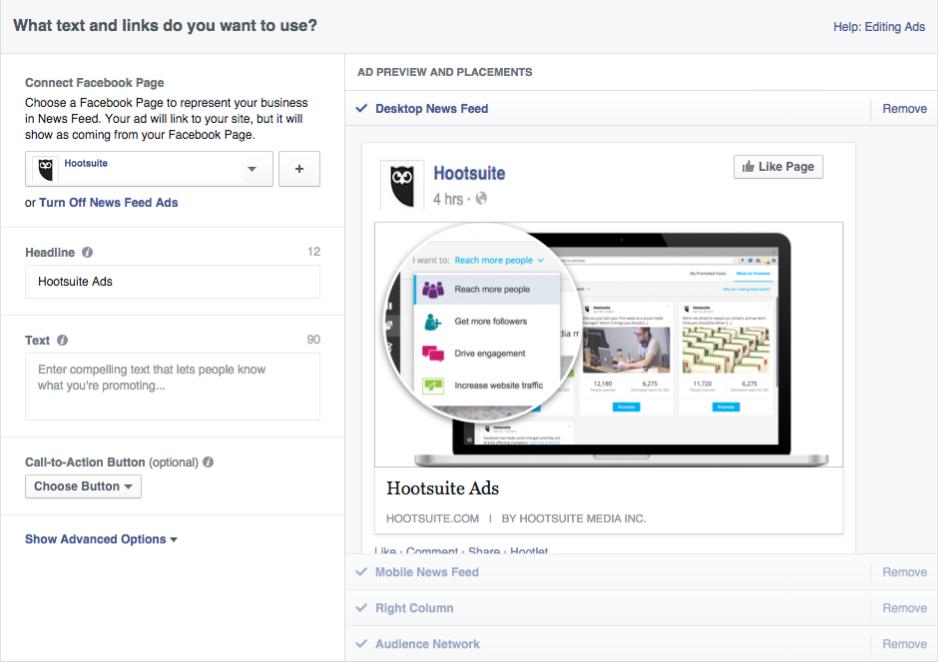
Facebook. Choose your images, headline, body text, as well as placement
of the actual ad. You can have up to five images and the headline text
can only be 25 characters.
Keep in mind that because your headline is so short, your copy has to
be intriguing enough for people to want to click on it. Along with the
headline, there is also text that will accompany the post. This can only
be 90 characters long, which means your copy needs to be clear and
concise (think of it as a really good Tweet!).
Lastly, you need to choose the placement of your Facebook Ad. Choose
whether you want it on people’s desktop News Feed, mobile News Feed,
right column, or audience network.
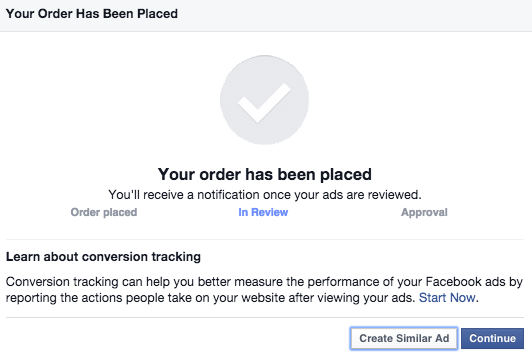
Step 6: Place your order
Once you’re ready for your ad to be reviewed, click on the green
button that says Place Order, located on the bottom right-hand corner.
You’ll receive an email from Facebook once your ad has been reviewed and
approved.
Step 7: Create a Facebook ads report
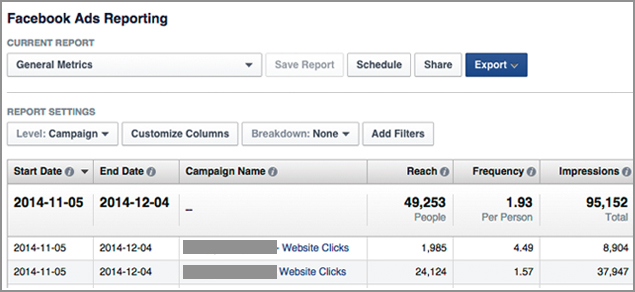
Now that you have created your Facebook Ads, it’s important that you report on the successes (and failures) of your endeavors. To create a report on your Facebook Ads visit Facebook’s getting started site.
Go to Ads Manager
and click Reports in the navigation. You’ll automatically see data from
the default report called General Metrics over the last 30 days for
your active campaigns.
Customize the metrics you see in your report and then click the blue Export button on the top-right column to download your report.